

Resin crafting is a fun and rewarding art that lets you create everything from jewelry and home decor to functional art like coasters and trays and so many other items. Whether you’re a
beginner looking for a fun weekend project or an aspiring artisan aiming to sell handmade goods, this guide walks you through everything you need to know to get started.
What is Resin?
Epoxy resin is a strong, glue-like material made by mixing two components: a resin and a hardener. When these two parts are combined, they react chemically and harden into a solid, durable plastic. This material is widely used for coatings on floors and countertops, as a powerful adhesive, and in crafts, jewelry, and protective finishes. In simple terms, epoxy resin starts as a liquid and turns into a tough, shiny, and long-lasting surface once it dries.
Types of resin: Epoxy vs. UV vs. Polyester
There are several types of resin, and the three most common are epoxy resin, UV resin, and polyester resin. Each type has different properties and uses.
Epoxy resin is made by mixing two parts, a resin and a hardener, which react and harden into a solid, durable plastic. It is known for its strong bond, clear finish, and resistance to moisture and chemicals. Epoxy is often used for crafts, jewelry, coatings, and repairs because it cures slowly, allowing more working time and fewer bubbles.
UV resin is a single-part resin that hardens only when exposed to ultraviolet (UV) light. It cures very quickly, usually within minutes, and does not require mixing. This makes it ideal for small projects like jewelry, coatings, and quick crafts. However, it is not suitable for large or thick layers because the light cannot reach deep areas.
Polyester resin is an inexpensive, fast-curing resin often used in boat repairs, fiberglass projects, and automotive parts. It has a strong smell and can become brittle once cured. While it is good for industrial or large-scale work, it is less clear and less safe to handle than epoxy or UV resin.
Epoxy resin is strong and flexible, UV resin is quick and convenient for small projects, and polyester resin is economical and best for industrial applications.
What can you make? (Jewelry, coasters, trays, keychains)
You can make many creative and useful items with resin. Some of the most popular resin projects include jewelry, coasters, trays, and keychains.
Jewelry: Resin can be used to make earrings, pendants, rings, and bracelets. You can add glitter, dried flowers, pigments, or small charms to create beautiful and unique designs.
Coasters: Resin coasters are stylish and practical. They can be clear, colored, or decorated with items like gold flakes or seashells. The smooth, glossy finish also makes them heat- and water-resistant.
Trays: Resin trays are both decorative and functional. They can be used for serving, as vanity trays for holding perfumes and jewelry, or as art pieces. Mixing different colors and patterns gives each tray a one-of-a-kind look.
Keychains: Small resin molds can be used to create colorful and personalized keychains. You can embed initials, mini charms, or glitter to make them unique gifts or accessories.
Overall, resin is a versatile material that allows you to create both beautiful art and practical everyday items.
Tools & Materials Needed
Resin and Hardener: These are the two main components that create the resin mixture. When combined, they harden into a solid, glossy material.
Molds: Silicone molds come in many shapes and sizes and are used to form resin into items like jewelry, coasters, trays, or keychains.
Safety Gear: Always wear gloves, a mask, and protective eyewear to avoid skin contact and inhaling fumes. Work in a well-ventilated area.
Pigments, Glitters, and Inclusions: These add color, sparkle, and creativity to your resin projects. You can also use items like dried flowers or charms for decoration.
Measuring and Mixing Tools: Use accurate measuring cups, stir sticks, and disposable containers to mix resin and hardener thoroughly and evenly before pouring.
Safety First!
Ventilation & protective gear When working with resin, it is very important to keep safety in mind. Always work in a well-ventilated area or near an open window to avoid breathing in strong fumes. Wear protective gear such as gloves, a mask, and safety glasses to protect your skin, lungs, and eyes.
Skin contact and what to do If resin comes into contact with your skin, wash the area immediately with soap and warm water. Do not use alcohol or solvents, as they can make irritation worse.
Safe curing practices When curing resin, make sure the surface is level and free of dust. Keep your project in a safe area where it will not be disturbed, and avoid touching or moving it until it has fully hardened. Following these steps will help keep your workspace safe and your projects successful.
Getting Started – Basic Resin Pour
Creating your first resin project is exciting and easier than it may seem. This chapter will guide you through each step of a basic resin pour so you can achieve a smooth, clear, and professional-looking result.
Step-by-Step Tutorial for Your First Resin Pour:
Start by preparing your workspace with protective covering and gather all your materials. Measure equal parts of resin and hardener according to the instructions on your product’s label. Pour them into a mixing cup and stir slowly but thoroughly for two to three minutes, scraping the sides and bottom to make sure everything blends evenly.
Mixing Ratios:
Most epoxy resins use a 1:1 ratio, meaning equal parts of resin and hardener. However, some types may require different ratios, so always check your product’s instructions. Accurate measuring is important because incorrect ratios can lead to soft or sticky results.
Removing Bubbles:
Once the resin is poured into the mold, bubbles may rise to the surface. You can remove them by gently blowing on the surface with a straw, using a heat gun or lighter briefly, or letting the piece rest for a few minutes so bubbles naturally rise and pop.
Curing Time and Demolding:
Allow your resin to cure in a dust-free area. Curing time can vary depending on the type of resin, temperature, and humidity, but most projects take 24 to 72 hours to fully harden. Once cured, gently remove your piece from the mold. If it feels slightly flexible, let it sit longer until it becomes firm.
With patience and practice, your first resin pour will help you understand how the material behaves and build confidence for more advanced projects.
Coloring, Glitter, & Inclusions
Adding color and decorations to your resin projects is one of the most enjoyable parts of the creative process. With the right techniques, you can make your pieces vibrant, sparkling, and full of personality.
How to Add Pigment:
Resin pigments come in liquid, paste, or powder form. Start with a small amount and mix it into your prepared resin until you reach the desired color. You can blend multiple shades for custom tones or add white to create a pastel effect. Always mix pigments thoroughly to avoid streaks or uneven coloring.
Using Glitter and Dried Flowers:
Glitter adds sparkle and depth to your projects. Sprinkle it directly into the mold or mix it into the resin before pouring. For a more natural look, try adding dried flowers or leaves. Make sure they are completely dry before using, as moisture can cause cloudiness or prevent the resin from curing properly. Arrange them carefully in the mold using tweezers to achieve the perfect design.
Layering Techniques:
Layering allows you to create depth and dimension in your resin art. Pour a thin layer of resin, let it partially cure, and then add your next layer with color, glitter, or inclusions. Repeat as needed. This method prevents items from sinking to the bottom and gives a beautiful, floating effect.
Experimenting with pigments, glitter, and inclusions helps you discover your personal style and makes every resin piece a unique work of art.
Jewelry Making with Resin
Creating jewelry with resin is a fun and rewarding way to turn your creativity into wearable art. Whether you are designing pendants, earrings, or small charms, resin allows you to combine color, texture, and shine in endless ways.
How to Make Resin Pendants and Earrings:
Start by choosing a small silicone mold or metal bezel in the shape you want. Mix your resin and hardener according to the instructions, then add any desired pigment or glitter. Slowly pour the mixture into your mold or bezel, filling it just to the top. Allow the resin to cure completely before removing it. For earrings, attach hooks or studs using jewelry findings once the resin pieces are fully hardened.
Using Bezels and Molds:
Bezels are small metal frames that hold the resin in place, while silicone molds create shaped pieces like hearts, circles, or teardrops. Bezels are perfect for embedding small objects or photos since they create a flat surface for sealing. Molds, on the other hand, allow you to experiment with three-dimensional designs. Always make sure molds are clean and free of dust to get a smooth, glossy finish.
Embedding Objects Like Beads, Leaves, and More:
One of the best features of resin jewelry is the ability to trap small decorative items inside. You can embed beads, dried flowers, leaves, charms, or even tiny shells. Place these items in the mold or bezel before pouring, or layer them between resin pours for a floating effect. Use tweezers to position them carefully, and make sure they are dry and clean to prevent bubbles or cloudiness.
With patience and creativity, resin jewelry making opens up countless possibilities for beautiful, one-of-a-kind designs that reflect your personal style.
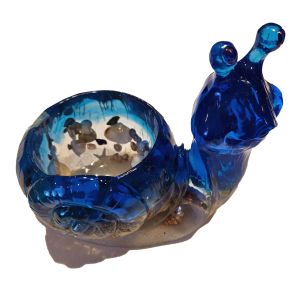
Home Decor Projects
Resin is not only great for small crafts and jewelry but also perfect for creating stunning home decor pieces. Its glossy, durable finish makes it ideal for practical and decorative items that add color and style to any space.
Resin Coasters:
Coasters are one of the easiest and most popular resin projects. Start by choosing round, square, or abstract molds. Mix your resin and add color, glitter, or inclusions such as gold flakes or shells. Pour the mixture into the molds and let it cure completely. Once hardened, sand the edges if needed and add cork or felt backing to protect surfaces. Resin coasters make wonderful gifts and can be customized to match any home style.
Geode Art:
Geode-inspired resin art mimics the look of natural gemstones. To create one, use a wooden or canvas base and pour layers of tinted resin in different shades of the same color. Add metallic accents or glitter lines to resemble crystal veins. You can also sprinkle crushed glass or stones for texture. Geode art can be displayed as wall decor or serve as a stunning tabletop centerpiece.
Tray with Handles:
A resin tray combines beauty and function. Choose a tray mold or line a shallow frame with a plastic sheet. Mix and pour your resin, then add pigments, swirls, or embedded items for decoration. Once cured, remove it from the mold and attach metal or wooden handles. Resin trays can be used for serving, displaying candles, or organizing jewelry and accessories.
Home decor projects are a wonderful way to explore the artistic side of resin crafting while creating items that are both practical and eye-catching.
Troubleshooting & Tips
Even experienced resin artists run into problems from time to time. Learning how to fix common issues will help you create better results and avoid wasting materials. Here are some simple solutions and helpful tips for smooth, professional-looking resin projects.
Sticky Resin?
If your resin feels sticky or never fully hardens, it’s usually due to incorrect mixing or wrong ratios. Always measure both parts accurately and mix thoroughly for at least two to three minutes, scraping the sides and bottom of your cup. Make sure your workspace is warm enough, as resin cures best in temperatures between 70°F and 80°F (21°C to 27°C). If a piece remains tacky, you can try brushing a thin layer of properly mixed resin over the surface or sanding and recoating it.
Bubbles That Won’t Go Away?
Bubbles are a common issue, especially when mixing too fast or pouring too quickly. Stir slowly to reduce air pockets and let the resin sit for a few minutes before pouring. You can use a heat gun, lighter, or even a warm breath through a straw to pop surface bubbles. For deep molds, pour the resin in layers, allowing each to settle before adding more. Warming the resin slightly before mixing can also help bubbles rise more easily.
Tips for Perfect Molds:
Always make sure your molds are clean, dry, and free of dust before pouring. A quick wipe with rubbing alcohol can help. Use high-quality silicone molds for the best results and store them flat to avoid warping. After demolding, wash your molds with mild soap and water and let them air dry completely. To keep your finished pieces shiny, you can sand any rough edges and apply a thin topcoat of resin for a polished finish.
By following these tips and troubleshooting steps, you’ll gain more confidence and consistency in your resin projects, turning small mistakes into valuable learning experiences.
Finishing Touches
Once your resin piece has cured, the final steps make all the difference in achieving a smooth, professional look. Proper finishing enhances shine, durability, and overall presentation, especially for jewelry and display pieces.
Sanding and Polishing:
After demolding, you may notice rough edges or uneven surfaces. Start by sanding these areas with fine-grit sandpaper, working gently in a circular motion. For a glass-like finish, progress to higher grits or use a polishing compound designed for resin. Wipe your piece clean between steps to remove dust. You can also use a soft cloth or polishing wheel to bring out an extra shine.
Adding Hooks, Chains, and Findings:
For jewelry projects, this step turns your cured resin shapes into wearable pieces. Use small hand tools like pliers to attach jump rings, earring hooks, or chains. Drill small holes carefully if needed, making sure the resin is fully hardened before doing so. For keychains or charms, attach metal rings or clasps securely so the piece can handle daily use.
Varnishing or Sealing:
A clear varnish or resin topcoat helps protect your finished piece from scratches and UV damage. Apply a thin, even layer with a soft brush or pour a small amount of resin over the surface for a glossy coat. Allow it to cure in a dust-free area. For matte finishes, use a light varnish spray instead.
Taking time to properly sand, polish, and seal your work ensures your resin creations look refined, last longer, and truly stand out.
Inspiration Gallery + Project Ideas
Resin art is full of creative possibilities, and every project can be personalized with color, texture, and design. Whether you’re crafting for fun, decorating your home, or starting a small business, these ideas will spark your imagination and help you explore new ways to use resin.
10 Project Ideas:
-
Ocean Wave Coasters – Blue and white swirls that mimic ocean waves, finished with a sandy edge.
-
Pressed Flower Jewelry – Dried flowers sealed in clear resin pendants or earrings.
-
Galaxy Keychains – Deep blue, black, and purple tones with glitter and tiny stars.
-
Geode Wall Art – Layers of colored resin and metallic accents shaped like gemstones.
-
Personalized Name Tags – Custom resin tags for bags, pets, or gifts.
-
Resin Bookmarks – Thin, colorful designs with gold flakes or flower petals.
-
Serving Tray with Handles – Elegant resin tray in marble or pastel tones.
-
Tabletop Art Piece – Decorative resin pour on a wooden panel with metallic streaks.
-
Resin Light Catchers – Translucent designs that glow beautifully in sunlight.
-
Custom Coasters Set – Themed sets such as zodiac, floral, or color gradients.
Seasonal Crafts (Christmas, Spring, Halloween):
Resin is perfect for making festive decorations. For Christmas, try glittery ornaments, snowflake coasters, or personalized gifts. During Spring, create floral jewelry or pastel-colored trays with dried blossoms. For Halloween, make spooky keychains, glow-in-the-dark charms, or black-and-orange art pieces. These seasonal projects are fun to make and great for selling or gifting.
Business Tips for Selling Resin Crafts:
If you want to turn your resin hobby into a small business, start by building a clear brand style. Take bright, well-lit photos of your products and share them on social media platforms like Instagram or Etsy. Price your items to cover both materials and your time. Offer custom orders for unique, personalized gifts. Always package your items safely, and include care instructions for customers. Building trust and maintaining quality will help your resin business grow successfully.
Whether you’re crafting for yourself or selling your work, resin art offers endless opportunities to express your imagination. One of the best places to get resin is at Amazon.com